MobileMap utilizes two broad categories of data - operational data and base map data. Operational data are stored in ArcGIS Feature Services and contain the data model for collecting and editing data. These data are uploaded and downloaded from the feature service when a user is online. Base map data, on the otherhand, are read-only data layers that provide background imagery and related data (e.g., ownership boundaries, streams, roads, etc.). MobileMap supports a range of file formats for base map data, including Esri Tile Packages (TPK), Esri Compact Tile Caches (CTC), MBTiles databases (MBTiles), Shapefiles (SHP) and Comma Separated Value (CSV) files. The most common formats used in MobileMap are TPK and SHP, and creation of these files are described in the sections below.
Esri Tile Packages (TPK) are tiled images stored at multiple zoom levels. The zoom levels follow the standard Esri/Google/Bing tiling system which is best described here . This tiling system uses the Web Mercator projection and zoom levels range from 1 (lowest resolution, whole earth stored in 4 tiles that are 256 pixels x 256 pixels each) to 23 (highest resolution, each pixel represents 1.87 cm of the Earth's surface). There are several ways to create TPKs, including in ArcMap, ArcGIS Pro and MobileMap. The sections below describe the process for creating TPKs in ArcMap and MobileMap.
NOTE: The TPK format is very similar to Esri's lesser known Compact Tile Cache (CTC format) mentioned above. In fact, a TPK is merely a Zipped folder containing a CTC, along with some related metadata. In the early days of of MobileMap (circa 2013) we routinely converted TPK file extensions to .zip, unzipped them, and extracted the CTC. There are small performance gains from using these unzipped data. In recent years, with the advances in mobile device hardware, we have not found this step to be necessary. If you are using very large TPKs and seeing a performance issue when loading or panning base map data, reach out to our support team for instructions on how to create and use CTCs instead of the easier to use TPK format.
The first base map loaded into MobileMap will set the extent of the map. When more than 1 base map is used, it is important that the first map that is loaded covers the FULL extent of ALL base maps. The easiest way to do this is to create a ‘default’ folder and store a single large, low-resolution TPK (within a subfolder named ‘TPK’). When MobileMap loads, it will first load all TPKs in the ‘default’ folder and will set the map extent to that large area base map. It will then load all of the TPKs and Shapefiles in the selected project folder. For example ‘default’ TPK could be of the world or State your project is in. You want the extent to be large enough to cover all possible areas you might work.
Zoom levels range from 1 (lowest resolution, whole earth stored in 4 tiles that are 256 pixels x 256 pixels each) to 23 (highest resolution, each pixel represents 1.87 cm of the Earth's surface)
Zoom level 16 or 17 are the minimum recommended for Forestry work
Zoom level 19 might be necessary for wetlands work
Zoom level 6 or less might be sufficient for a default TPK
MobileMap uses a specific directory structure which must be followed closely. This directory structure can be implemented on a device's internal SD card, but is typically implemented on an external SD card.
The folder structure for MobileMap can be created in one of 3 different ways:
Create the folder structure directly on your mobile device using the default file manager on your device
Connect your mobile device to your PC using a USB cable and then use Windows Explorer to create the folder structure on your device (e.g., This PC > Galaxy Tab Active > Card)
Remove the MicroSD Card from your device and insert it into your PC (using an SD Card adapter) then use Windows Explorer to create the folder structure on the card (e.g., Card (D:)). If base map TPKs are available, copy them into the TPK folder for the appropriate project folder. Finally, remove the MicroSD card from your PC and reinsert it into your device then power on your device.
The folder structure should look this:
SD Card
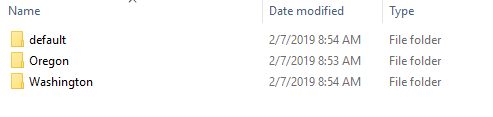
MobileMap
default
project1
TPK
SHP
project2
TPK
SHP
…
Start by creating a parent MobileMap data folder called MobileMap.
Within the MobileMap folder create one subfolder for each project or 'map cache'. Some users create new map cache folders for each geographic area where they work. Other users create different map cache folders for different types of work, based on the base map data they like to have displayed when performing that work. Still others use a single map cache for all of their work. The strategy will depend on the volume of data that you need, the number of distinct geographic areas where you work, the degree to which larger work areas are separated into regions or other groups, etc. For this example we will create two map caches, one for Washington and the other for Oregon.
For each map cache folder (e.g., sdcard\MobileMap\region1), create two subfolders, TPK and SHP.
Add shapefiles to the SHP folder and TPKs to the TPK folder.
Note that Shapefiles must be projected into WGS 1984 Web Mercator (auxiliary sphere) to display correctly in MobileMap.
Shapefiles names should not include spaces or special characters.
There is a known bug in MobileMap that prevents proper display of date fields in Shapefiles. If dates are needed, they will need to be converted to text. To do this, follow these steps:
Create new text field
Calculate the text representation for the date by using field calculation capabilities in ArcMap or ArcPro (e.g., Datefield = [Orig_Date]). This will store dates as text in the format M/D/YYYY (e.g., ‘1/23/2019’)

Repeat the steps above to create additional map cache folders and add in the necessary Shapefiles and TPKs
Optionally, create an additional map cache named 'Default' and include the same two subfolders: TPK and SHP
The default map cache can be used to store any data that should be used as a base map for all projects. Typically a very large extend but low resolution TPK is stored in sdcard\MobileMap\Default\TPK to provide a common base map for all MobileMap use. An example might be the entire continent at zoom level 6, or an entire state at zoom level 8
Once the data are correctly organized, copy the MobileMap folder from your desktop to the root folder of your SD Card. Removing the SD card from your device and using a USB to micro SD card adapter in your PC will be the fastest way to transfer data to the SD card, although data can also be copied over a USB cable
Below are examples of a typical file structure on an SD card for MobileMap. The example below has two map Caches (OR and WA), each with 2 TPKs, and 2 Shapefiles.
MobileMap Root Directory
Map Cache Directory (OR or WA)

SHP Folder Structure
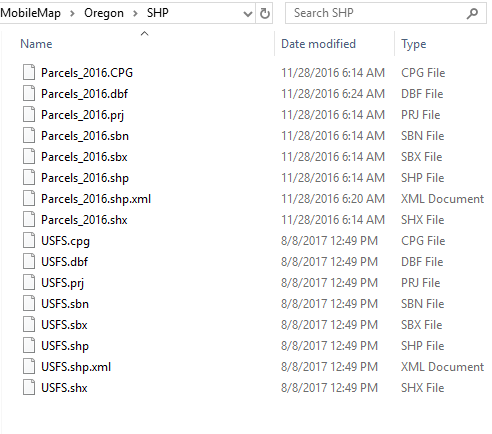
TPK Folder Structure

Note: Starting at MobileMap version 4.3.39, this functionality is available for organizations that use Portal for ArcGIS, but this requires a few configuration steps to be completed by your Portal administrator. To learn more, see the section on Base Maps in MobileMap: Using Portal for ArcGIS
MobileMap includes a Download Base Map tool as a convenient method for obtaining base map data, including imagery and topo maps. When downloading TPKs from the Download Base Map tool, MobileMap is accessing the 'export' function from Esri's base map services. This functionality is limited to a maximum number of tiles, and there are additional practical limits on total file size of an exported TPK file. Keep in mind that the size of a TPK is a function of the extent and the maximum zoom level. For large base maps (e.g., high resolution imagery for a whole county or state) use ArcMap and an imagery source that you have local access to (e.g., a download of NAIP data). If you need high resolution data for a demo or small project, use this approach and a high zoom level (e.g., 19) but limit the spatial extent of your download to a very small area. If you want to have a large basemap just to serve as a frame of reference, use a large extent but limit the maximum zoom level to a very low level (e.g, 6 or 8). While there is no hard rule on the maximum extent or zoom level combinations that are supported, we have found that TPKs larger than 100 MB in size do not always create or download properly when downloaded from within MobileMap. To be safe, try to limit the size of downloaded TPKs to under 50 MB.
In addition to the caveats above, there is one additional problem with TPKs generated via this tool - they include a maximum zoom level parameter in their metadata. This parameter causes the TPKs to disappear if you zoom in beyond that zoom level. So, rather than getting pixelated or blurry, they simply disappear. In many cases this is not the desired behavior. TPKs created in ArcMap (process described above) do not have this limitation. If you want to use the Download Base Map tool in MobileMap but do not want your TPK to disappear at higher zoom level, there is an optional step that can be performed to remove this maximum resolution parameter from the TPK file, but it is a bit complicated. See the optional instructions at the bottom of this section for more details.
To create TPKs in MobileMap use the Download Base Map tool by following these steps:
Sign in to ArcGIS (Actions > SIGN IN TO ARCGIS)
Open the Download Base Map tool (Actions > Download Basemap)
Select the layer you would like to download from the dropdown list
Pan and zoom the map to the desired extent
Select the maximum zoom level that you would like to download.
Note that if the optional step below is NOT followed, the TPK that is created will disappear when the the map is zoomed in beyond this maximum zoom level
Select DOWNLOAD
Android 10+
If your device is running Android 10 or higher, you will be prompted for the download location. Select the ‘TPK’ folder within your desired project or the default folder (see folder structure discussion above). It is possible to create new folders if needed in this dialog. It is also possible to replace the auto-generated filename but the file must end in ‘.tpk’
Note: some users have recently reported issues with a recent (November 2022) upgrade to Samsung Tab Active 3 devices that is producing files that end in ‘.tpk.part’ rather than the standard ‘.tpk’ extension. We have attempted to address this in release 4.4.11, but if you find that this is causing a problem on your mobile device simply use a file manager to rename the TPK file from *.tpk.part to *.tpk. If you have any problems with this please contact our support team.
Android 9 and lower
If your mobile device is running Android 9 or lower, the file will be downloaded to your mobile device’s Download folder using the automatically generated file name.
Use a file manager (e.g., Files, MyFiles) to copy the TPK to a map cache's TPK folder (see instructions above for more information about file structure).
When MobileMap initiates the TPK export request, ArcGIS Online will report the estimated file size, and MobileMap will display these as a brief popup message. In our experience, file sizes below 50 MB tend to be successful, while file sizes above 150 MB frequently fail. It is not always clear why downloads fail when they do (e.g., request times out, server rejects request because it exceeds the maximum allowed number of tiles, download is corrupted in transit, etc.). When downloads fail, there may not be any confirmation of the failure - it may just freeze. In these cases, it will likely be necessary to reduce the extent or zoom level and repeat the download.
Optional - If you want to use the Download Base Map tool in MobileMap but do not want your TPK to disappear at higher zoom levels as described above, follow the steps below:
After step 7 above, and before saving your file into it's final destination it is possible modify the TPK to remove the maximum scale parameter. This step involves several steps and can be thought of as an advanced technique. If you are not comfortable with manipulating files and file management in both a PC and Android please do not attempt this process. To remove the maximum scale parameter complete these steps:
Copy the TPK file produced in step 6 above to a PC where you have access to a 3rd party zip file creator application like 7-zip (the default Windows zip capabilities will not work correctly for this process) and a text editor (e.g., Notepad++, Atom)
Rename the TPK file extension from .tpk to .zip
Unzip the file
Navigate within the resulting folder to \servicedescriptions\mapserver
Open the mapserver.json file in a text editor and do the following
Search for the text "maxScale"
Wherever this property exists and is not set to zero, it will be set to the map scale that corresponds to the zoom level you selected when building the TPK. For example, if you selected zoom level 15, you will find one or more instances of "maxScale": 18055.95 which indicates that the maximum map scale is 1:18,055.
Replace all instances of this with the map scale for zoom level 23, using: "maxScale": 70.53
Save the modified file
Re-zip the folder using your Zip applications, setting to no compression (e.g., compressionf format = 'storage'). This step is important, we don't want to actually compress the data, we just want to contain it into a single zip file
Replace the .zip file extension to .tpk
Copy the resulting TPK file to the correct destination folder in MobileMap and test
NOTE: As of ArcMap version 10.2, it is no longer possible to create tile packages (TPKs) that contain ArcGIS Online hosted base maps or any other streaming sources such as NAIP imagery. Prior to ArcMap 10.2 (e.g., ArcGIS 10.1) it was possible to include these data as inputs to tile packages.
From ArcPro, you are able to create TPKs from streaming sources other than ArcGIS Online hosted data, such as NAIP streamed from the APFO’s public ArcGIS Server.
Steps for creating a TPK in ArcMap
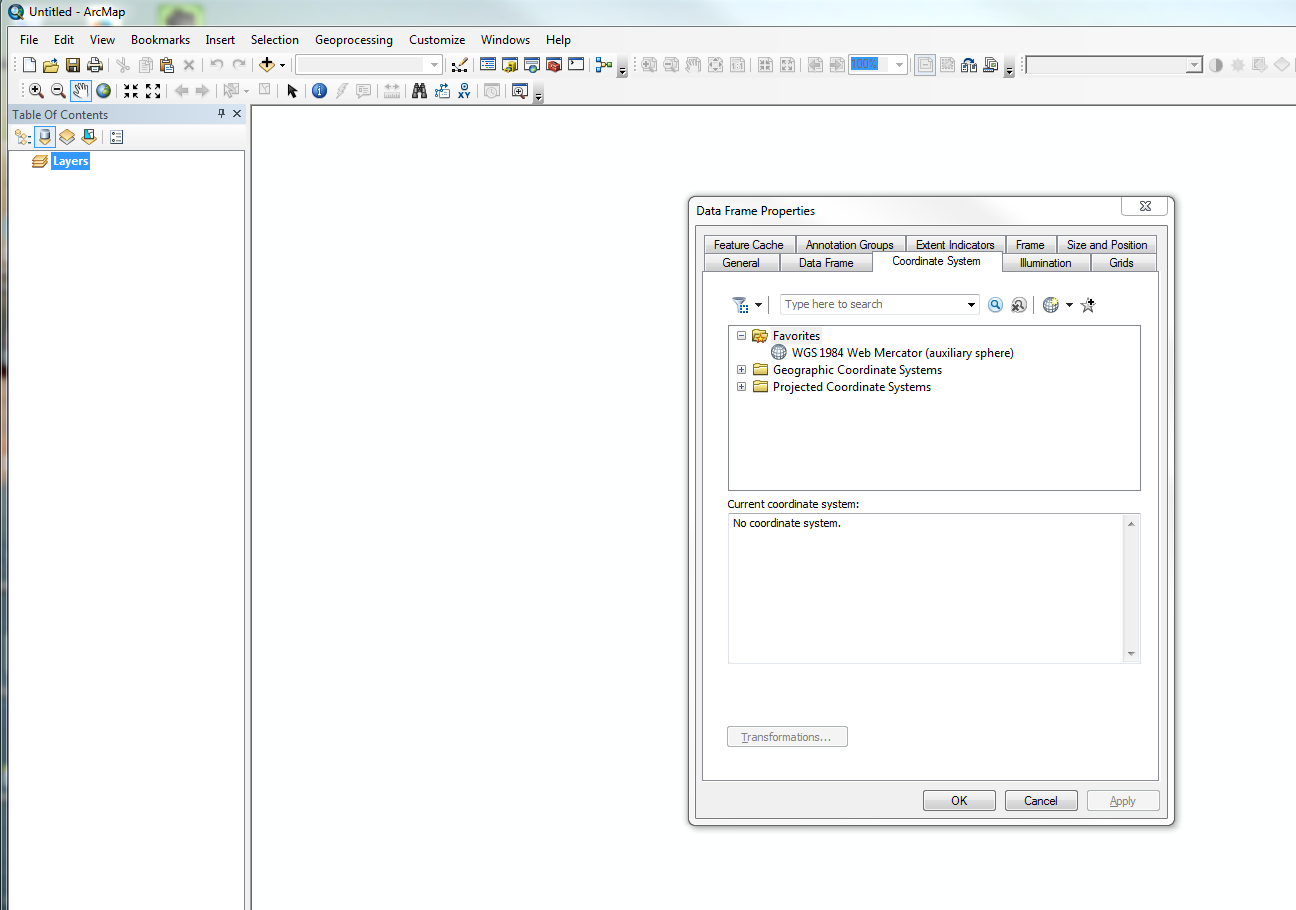
Open a map document in ArcMap. Change the coordinate system of the data frame (“Layers” in the example below) to WGS 1984 Web Mercator (auxiliary sphere). This option is found under Projected Coordinate Systems -> World -> WGS 1984 Web Mercator (auxiliary sphere).
Add base map data as needed from existing imagery or other inputs. Note that raster data that are not from streaming services should be projected into WGS 1984 Web Mercator (auxiliary sphere) coordinate system before adding them to the map when creating TPKs. Vector data, including points, polylines, polygons from Shapefiles or Feature Classes, do not need to be re-projected as long as the data frame projection has been set to WGS 1984 Web Mercator (auxiliary sphere). ArcMap will project vector data as needed (on-the-fly) when building the TPK.
Set the symbology (colors, display scale levels, labels, etc) for all layers.
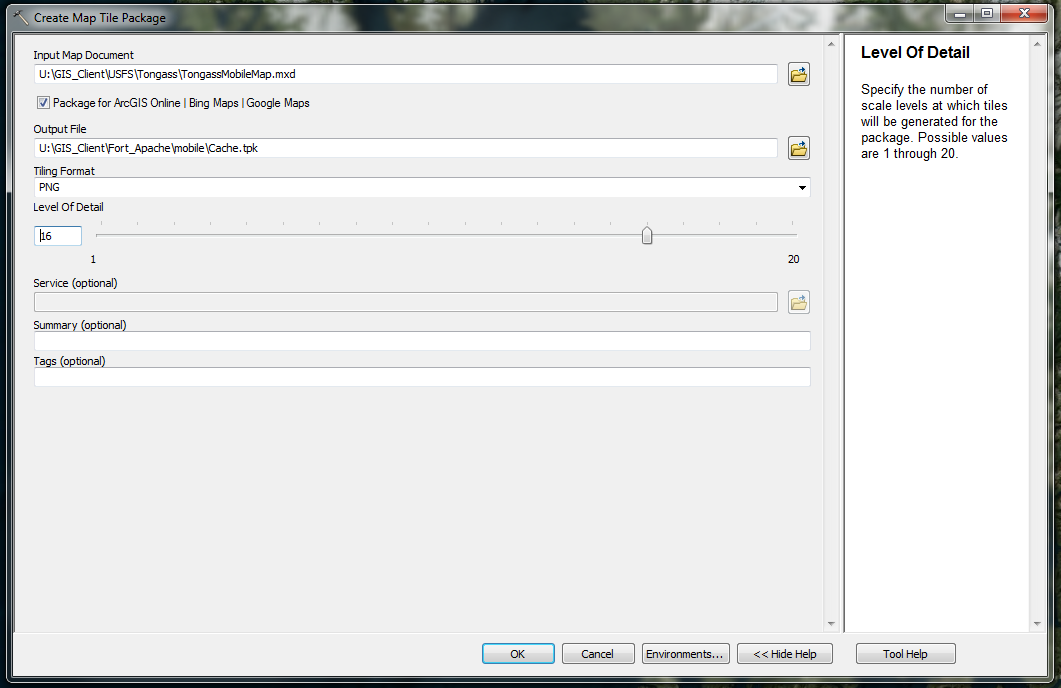
Add metadata to the Map Document Properties (File -> Map Document Properties) Summary and Description boxes (this is required for the Create Map Tile Package Tool) and save the map.

Open the ‘Create Map Tile Package’ tool.
Select the map document you want to cache (make sure the data frame shows the entire area you want to cache) and that you have saved the MXD since your last change
Select the name for the output file (it will be a tpk file format)
We recommend using a naming convention that includes the zoom level (see next step) as well as the source or type of data (e.g., Oregon_NAIP_2017_L18.tpk)
Set the level of detail to the desired level. Level 16 to 17 is standard for forestry work, while a higher level like 19 might be more appropriate for wetlands work.
Click OK to run the tool.
After the tool completes its process, navigate in Windows Explorer to the folder where you saved the output .tpk file.
Follow steps below to store the TPK you created into the correct directory structure for use in MobileMap.
The general steps for creating TPKs in ArcPro are the same, but the specific tool is slightly different. To being, follow the steps above to add the content to your map, then use the Geoprocessing tab and search for Create Map Tile Package. It is important to select this exact tool and not the vector tile or mobile map package tools. Once the tool is opened, complete the following:
Select your active map
Select the output filename (e.g., LocationA_Imagery_L16.tpk)
Select minimum level of detail (choose 0 here)
Select maximum level of detail (as noted above level 16 or 17 is recommended for forestry work)
Enter summary and tags (optional, not used by MobileMap)
Select the extent (typically the current map extent)
Choose package type (only ‘tpk’ supported at this time within MobileMap)
Image below shows example of completed inputs ready to be run:

To add streamed NAIP Imagery from the APFO’s public ArcGIS Server to ArcPro and cache it:
On the Insert tab, select Add Connections > Server > New ArcGIS Server
Paste this web address into the Server URL box and save: https://gis.apfo.usda.gov/arcgis/rest/services
Load the CONUS NAIP imagery from the Catalog window (under the Servers folder) into a map
Zoom to an area of interest, save the map
Run the Create Map Tile Package tool with .tpk as the output format (see above)
Note, esri supplied reference data (not imagery) can be cached over NAIP imagery if road/place names on top of the imagery is desired.
Imagery acquired for a project and stored locally on a computer (not streamed from an online source) can be cached in Arc Pro via the following instructions.
• Load rasters to mosaic dataset (dataset can be in Web Mercator even if rasters are not). In the past, imagery has needed to be projected to Web Mercator prior to caching. As of Arc Pro 3.x, imagery does not projected Web Mercator, as long as the data frame coordinate system is set to Web Mercator prior to caching.
• Build Pyramids and Calculate Statistics as you load rasters in the mosaic dataset.
• Once the mosaic dataset has been created. Open the Attribute table of mosaic dataset from pro and field calculate Max PS (Max Pixel Size to something like 1000 or 5000).
• Open the properties of the mosaic dataset from catalog and change number of rasters to display in the properties from 20 to the number you have in the dataset
• Use the Mosaic Layer properties (ribbon button) to display “none” on the stretch type
• This should give you a color balanced, nice looking, raster image in Pro – cache this
• You can use the Mosaic Layer properties (ribbon button) to apply the Color Infrared version