
Starting Point
When an existing Feature Service has been developed by WSG or LandMark it will be provided to you as a File Geodatabase (FGDB) and an ArcMap Document (*.mxd) or ArcPro Project (*.aprx). Additionally, you may be provided with ArcGIS Layer files (*.lyr) which define the symbology for feature layers. If business rules have already been developed, they will be stored in the FGDB in the appropriate tables (Rules, Related_Domains, Check_Rules). The steps below can be used to publish the Feature Service from these inputs. If you have developed the data model independently, the steps below can be used to develop an ArcMap Document or ArcPro Project and publish a Feature Service.
ArcMap / ArcPro Settings
If developing a ArcMap Document or ArcPro Project from scratch, add all Layers and Tables to your Map in ArcMap or ArcGIS Pro, then adjust the settings, layer order and symbology by following the steps below.
General
Map document name - we recommend using the same name as the feature (e.g., Cruise_Data_Model_v2). This is helpful when overwriting a Feature Service, as ArcMap will know which Feature Service you are attempting to overwrite.
Map Layer - set projection to Web Mercator (Auxiliary Sphere)
Map Document Properties
Layer Order
The typical layer order is as follows:
Layers
Plots
Stands
Source_Stands
Generic Points
Generic Lines
Generic Polylines
Tracks
Tables
Trees
Logs
Rules
Check_Rules
Related_Domains
ArcMap example:

Symbology
For each layer, apply symbology using Layer files (*.lyr) that are provided to you, or by creating your own symbology. While MobileMap supports a very wide range of symbols, InventoryManager is somewhat more limited. Please conform to the following standards to ensure maximum compatibility across the system.
Required
Simple Feature Symbols - Use Esri’s Simple Feature Symbols (esriSMS, esriSLS, esriSFS) instead of more complex Picture Marker Symbols. This is especially important for points. Simple Marker Symbols (esriSMS) use JSON instructions to define the size, color, outline color, outline width, etc. for the symbol, instead of using an encoded image as the symbol. The image below shows how to ensure that a point symbol is a Simple Marker Symbol. Note that this format has a limited number of options, including only the following shapes: Circle, Square, Cross, X, Diamond (square rotated 45 degrees).
Example of setting simple marker symbol symbology in ArcMap

Example of setting simple marker symbology in ArcPro (note the use of ‘Shape Marker’ and the selection of the circle shape that is access from the shape dropdown. This is not the same as using the gallery and selecting Circle 1 or other symbol, which will use Picture Marker Symbols).

Example of setting simple fill symbol symbology for polygons in ArcPro (note the need to select a ‘hollow’ shape from the gallery first, then modify the outline width and color properties). When a no-color or transparent fill is selected instead, InventoryManager will display a faint blue fill color rather than a hollow polygon.

Even with the ‘Extent Hollow’ shape selected from the gallery, the resulting service will show a semi-transparent fill in some environments, including WSG web apps such as InventoryManager. Therefore, further configurations are needed when a truly hollow polygon is needed (typical symbology for Stands). For each symbol (including all unique value entries), use the properties tab, then the wrench icon to show the ‘effects’. For truly transparent fill, click the X next to the outline ‘Offset effect’ and ‘Dash effect’ as well as the unlabeled fill effect below (see orange arrows below). That should remove those effects and the symbology will look like the right side of the image below. Click ‘Apply’ and repeat for all relevant symbols.

Unique Value Renderer
If using a Unique Value Renderer (e.g., a different color for each Plot according to it’s Status value), only use a single field to determine the symbol (not 2 or more fields). In ArcMap, use the option for ‘Unique values’ not ‘Unique values, many fields’.
Default values - use a default value with Unique Value Renderers to ensure that features that have a null for the category field will still have a symbol on the map. This unique value is what will be displayed in MobileMap when selecting this layer for query or edit.
Suggested
Points
Size greater than or equal to 10
No outline - while outlines can be helpful for seeing points with low contrast to background (e.g., a green point on a forested stand using imagery background, they can also make things visually cluttered and can obscure the fill color when points are too small. Instead, try to use colors that have high contrast and avoid using outlines. We have found that bright green is generally sufficiently high contrast to vegetation in most scenarios.
Lines
Polygons
Symbology Layer Files
The attached Zipfile below can be used to import symbology into ArcMap or ArcGIS Pro.

ArcMap - Settings and Publishing
Once the symbology, projection, data model and Editor Tracking (see MobileMap: Data Model / Data Modeling Process for more information on data modeling and Editor Tracking) have been set and saved, follow the steps below to publish the map document as a feature service in ArcGIS Online / Portal.
Note that some users have reported problems publishing feature services from ArcGIS Pro when the data (file geodatabase and/or Project file) are stored in OneDrive, rather than being stored locally. If you experience problems publishing to ArcGIS Online and you are using OneDrive, consider copying the data locally and re-attempt the publish. See more details on Esri’s support article: https://support.esri.com/en/technical-article/000025605
Make sure to zoom out to an extent that covers all of the area for the relevant data to be published. For example, if you have data which consists of all counties in California, zoom out on the map to show California, Oregon and Mexico.
Once zoomed out, save the map document and do not zoom back in before publishing.
Ensure that you are logged in to your ArcGIS Account in ArcMap / ArcPro. To sign in from ArcMap, go to File -> Sign In.
Publish the service using the ‘Share’ option in ArcMap (File -> Share As -> Service). Select ‘Publish a service’ and name the service. We recommend using the same naming convention as field names - title case with underscores, and include a version number if helpful (e.g., Title_Case_With_Underscores_v2). Note that the feature service names will be displayed alphabetically in the ‘Select Feature Service’ dialog, and Android sorting is case sensitive - this means that ‘a' will be sorted below 'Z’ because capitol letters are sorted before (above) lower case letters. As described above, we recommend naming the ArcMap document (MXD) with that will be used for the feature service. This helps when overwriting a service after changes are made to the data model or symbology. Complete the following information during the publication process:
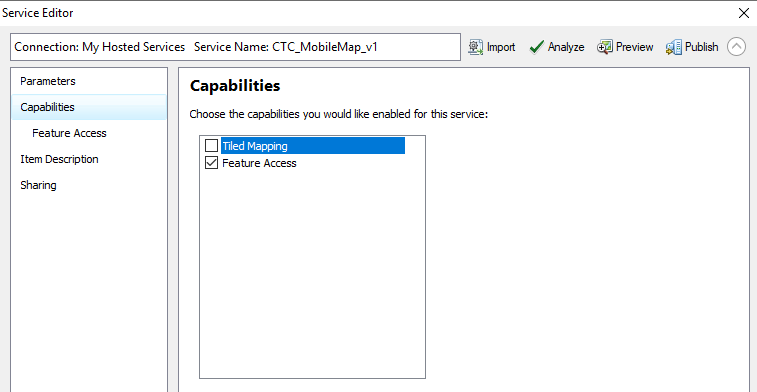
Capabilities - check Feature Access and uncheck Tiled Mapping.
Sync Enable - check this box to support Sync, which required for MobileMap 5.0.
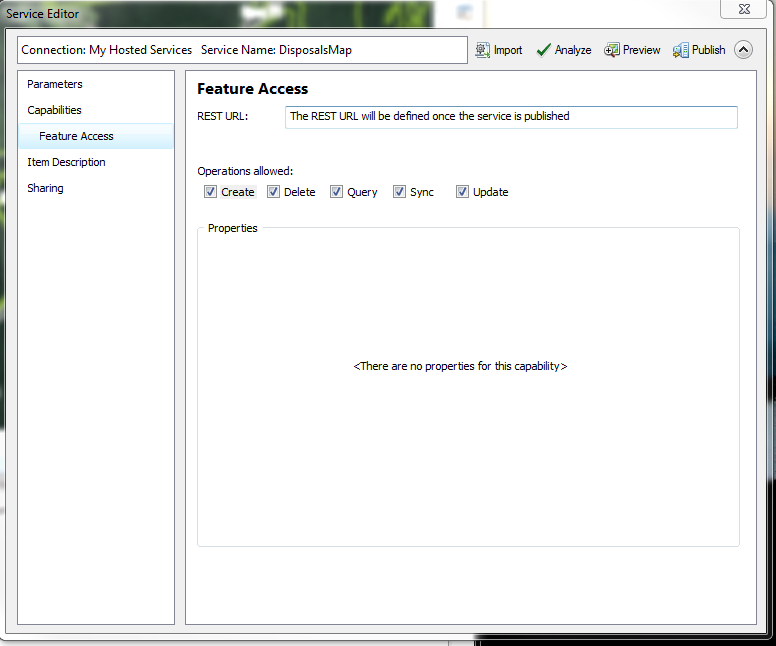
Feature Access - check the boxes next to Create, Delete, Query, Sync, and Update. (Figure 11)
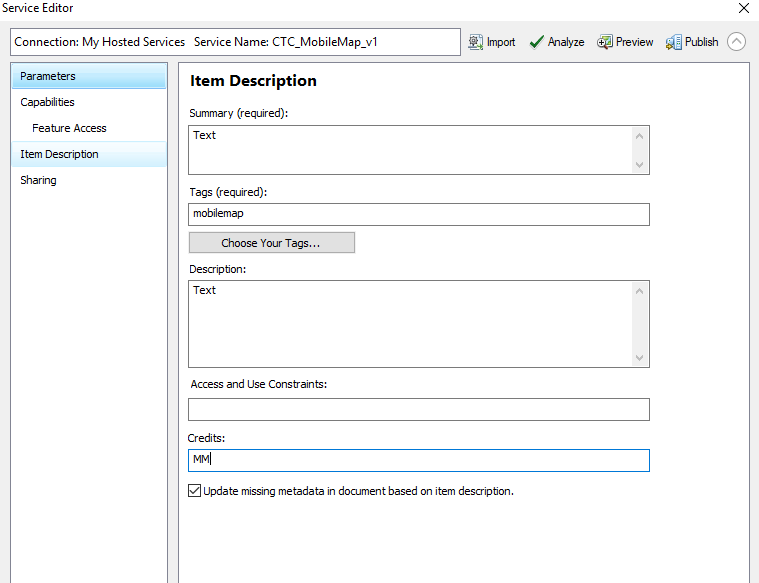
Item Description - add text in the Summary and Tags. If these were set in the Map Document Properties as suggested above, these will already be populated. Review them to make sure they are correct.
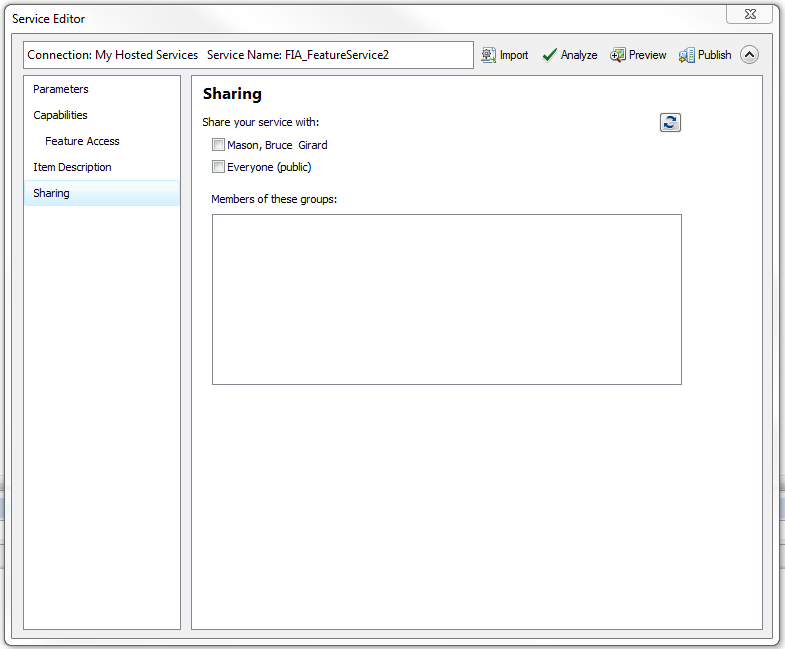
Sharing - choose the level of Sharing.
Selecting Everyone makes the feature service a ‘public’ service, meaning anyone could potentially find the service if they know what to search for on ArcGIS Online. This is NOT recommended.
Selecting your organization limits the sharing to just your group. (If you select your organization, you will need to put your ArcGIS Online user name and password in the settings of WSG MobileMap).
For MobileMap to find the service and display it in the ‘Select Feature Service’ dialog, the service must be shared with at least one group that the user is a member of. Sharing via ‘Everyone’ or ‘Your Organization’ is not sufficient for MobileMap to find the service.
See section below on Managing ArcGIS Online Groups and Users for more information on this topic
Finally, select Publish in the upper right corner.
Your feature service is now published. Log in to ArcGIS Online to review and confirm it is as expected.
ArcGIS Pro - Settings and Publishing
Map Properties
Use the map Properties to provide a Title, Tags, Summary and Description

Publishing
Publishing a Feature Service from ArcGIS Pro is implemented under the Share tab using the Publish Web Layer option. This terminology is a bit confusing, because you will actually be publishing a Feature Service, and it will have multiple layers, but that is the generic term that is used in ArcGIS Pro. Go to Share > Web Layer > Publish Web Layer

On the Configuration Tab
Check the box to enable editing (Add, Delete, Update) of Attributes and Geometry
Enable Sync (for compatibility with MobileMap 5.0 and Esri Field Maps)
Enable editing and allow users to add, delete and update attributes and geometry
Optionally enable Export Data (to enable export of full database as FGDB for backup, etc.)

On

MobileMap Settings - Saving to Feature Service
MobileMap settings can optionally be saved in the ‘description’ field of a Feature Service. This allows MobileMap to import optimized settings directly from the Feature Service itself when setting up a new device or changing to a new service. This approach is in contrast to manually configuring settings, or importing settings from a settings file.
To save MobileMap settings to a feature service, copy existing settings into the Map Properties ‘Description’ field. When the service is published (or republished) the settings can be imported into MobileMap by using Actions > Import Settings.
While adding MobileMap to the Feature Service is not required, it is recommended in order to provide efficient and consistent configuration of MobileMap devices. Note that there are some situations where this may not be desired (e.g., cases where MobileMap settings will be imported from settings files, rather than the feature service due to the use of different settings under different scenarios).
Follow the steps below to configure MobileMap settings, copy them to your PC, apply them to your Map and finally add them to the Feature Service. The This can be done before publishing the service, or before updating (overwriting) a service.
When copying MobileMap settings into your Map properties, follow these steps:
Configure one MobileMap device with all appropriate settings. Typically this is done by
Publishing the Feature Service without settings
Connecting to the service with MobileMap and manually updating settings until standard workflows can be completed. The most commonly changed settings include hidden fields, read only fields, tree and log fields to ignore, etc.
Export settings from MobileMap to a text file (Actions > Export Settings) and open up text file on your PC
Optionally edit the settings file to reduce the list of setting to just those that are non-default settings (only the settings you updated when configuring MobileMap)
Use a text editing tool to remove unnecessary whitespaces including line breaks, tabs and spaces (e.g., https://www.browserling.com/tools/remove-all-whitespace)
Paste the condensed settings into the map ‘Description’ field in Map properties
Example of settings in ArcGIS Pro:

Publish or republish your feature service
Managing ArcGIS Online Groups and Users
Once a feature service is published, it needs to be shared to one or more groups in order for users to find that service in MobileMap’s Select Feature Services tool.
Create New AGOL Group
In order for MobileMap to find a Feature Service using the Select Feature Service tool, it must be shared with one or more groups to which the user is a member.
If an appropriate group does not yet exist, create a new group, then invite users to join that group (see section below).
When creating a new group in AGOL, it is necessary to set the content editing rights for the group. In order to invite users from outside your organization, it is necessary to select the option to allow users to update their own items. Therefor, under the question ‘What Items in the group can it’s members update?’ select ‘Only their own items. Note that this applies to AGOL items, not data. Users will be able to add/edit/delete data that are created by other users, but they won’t be able to edit AGOL items (e.g. Feature Services).
Invite a Users to an AGOL Group
Assuming you have the AGOL username correct, there are two potential issues you may encounter when attempting to invite a new user.
User name is not found, even when ensuring option is set to search outside of your organization. This typically indicates that user’s profile is not set to public. Solution: ask the user to set their profile to public. This simply allows users to search for that user, it does not reveal any sensitive information about that user.
The second issue you may encounter is a notice that the user does not have sufficient privileges to join external groups (see error message below). If this happens, reach out to the user (or their AGOL administrator) and send them the following link, which describes the method to enable users to participate in external groups (https://support.esri.com/en/technical-article/000022195).

Accepting Group Invitations
Users must accept external group invitations before they become group members. For internal users, it is possible to add users automatically, without requiring them to accept the invitation.
To accept an AGOL group invite, log into AGOL. In the upper right corner of your browser window, just to the left of your user name, you should see a notification icon (bell with a number displayed). Click that icon and you will see a list of group invitations. Click the View your invitations link to view and accept the appropriate invitations.

Related Articles
