...
Create all Stands and Plots in MobileMap/InventoryManager (preferred approach)
This includes the incorporation of a Source Stands layer that may be coming from a separate Feature Service (e.g., Trimble Forestry LRM read-only stands layer as InventoryManager ‘Source Stands’ layer). In this scenario the workflow starts with copy of the stand geometry and relevant attributes from Source Stands to Stands which will include creation of the required Unique_ID values.
This also includes scenarios where no Source Stands layer is present, and Stands are heads-up digitized in InventoryManager
It even includes the scenario where Plots are created outside of MobileMap/InventoryManager and copied/loaded to the Plots feature layer and then the Plot Validation tool is used in InventoryManager to validate the Plots. The validation process will create the Unique_ID values on the Plots, assign the appropriate Parent_ID and Stand_ID values (from their containing Stand)
Create Stands outside of MobileMap and/or InventoryManager then copy/load stands directly into the the Stands layer (rather than using the InventoryManager Copy tool)
User must ensure that data are in Web Mercator or that the copy/load method handles on-the-fly reprojection to Web Mercator.
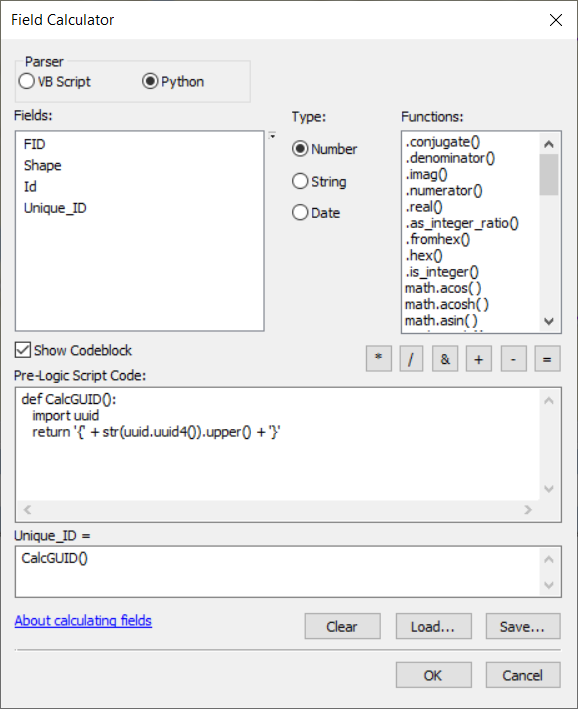
User must calculate Unique_ID value for each stand
In this approach, once the Stands are loaded, user proceeds with Plot creation in MobileMap/InventoryManager
Create Stands and Plots outside of MobileMap/InventoryManager
This approach is the most complex because it requires users to create Unique_ID values for each Stand and Plot, then copy the Stand Unique_ID value to each child plot as the Parent_ID value. If other fields are expected at the plot level (e.g., Stand_ID, region, owner, etc) they will also need to be populated on the plot.
As with option 2 above, the user must project their data to Web Mercator or use a copy/load tool that performs on-the-fly projection to Web Mercator.
...
Heads-up digitizing of Stands is described here
Plot creation in InventoryManager is described here
Plot creation in MobileMap is described here
The most common scenario is to utilize a Source Stands layer to populate stand geometry and key attributes (e.g., Stand_ID) then utilize the InventoryManager Copy tool create inventory stands that meet the data requirements of MobileMap/InventoryManager (e.g., required fields like Unique_ID, Stand_ID, etc.).
An existing or new layer is created as a read-only polygon layer in Web Mercator projection which has the Stand geometry and key attributes (e.g., Stand_ID) and added to InventoryManager as the Source Stands layer. Sometimes this layer is populated by an existing in-house or 3rd party application or GIS Layer. An example might be a read-only polygon feature layer that exposes a subset of stands stored in Trimble Forestry LRM that can be used to create new inventory stands in InventoryManager
If not populated from automated process like Trimble LRM, the source stands layer can be used simply as workflow step to get stands from other data sources loaded into the Stands layer used by MobileMap/InventoryManager. In this scenario, new stands are typically copied into the Source Stands layer using one of 2 approaches: Import from Shapefile using the Import SHP tool in InventoryManager, or copy via desktop GIS . The preferred approach for copying Stands (e.g., from a FGDB or Shapefile) (ArcMap or ArcGIS Pro).
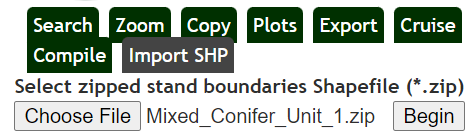
Import source stand data from Shapefile using the InventoryManager ‘Import SHP’ tool. This tool (available starting 12/2/21 but not enabled on all sites) allows a user to import a Zipped Shapefile and copies the stand geometries and attributes into the Source_Stands layer. Note that attribute fields must have the exact same name and data type to successfully import.
Copy stand data FGDB or Shapefile is using ArcGIS Pro. To copy stands in the source stands layer
Open a new ArcGIS Pro project
Add your source stands feature service to the project
Add your stands source data (e.g., Shapefile, FGDB, etc.) to the map
Modify the source dataset to include any fields that are required in your source stands layer (likely will match the fields that are required in your inventory stands layer as well).
This may include adding fields, performing field calculations, etc.
Use standard ArcGIS Pro tools and workflow to select the desired stands from your source stands layer
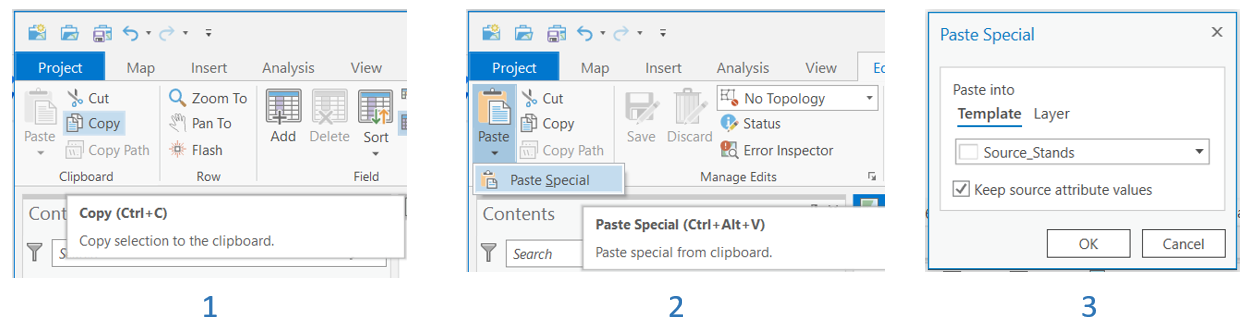
Use the Copy tool on the Edit > Clipboard menu in ArcGIS Pro to copy the stands to the clipboard (step 1 in image below)
Use the Paste Special tool on the Edit > Clipboard menu in ArcGIS Pro and select your source stands layer in your destination feature service, using the default action to copy the source attributes (steps 2 and 3 in image below)
Verify that the source stands received the copied features by refreshing the map in InventoryManager and if needed using the Search or Zoom tool to find the new data
If existing Plots must be imported, the best way to do this is to follow these steps:
Project the Plots to Web Mercator and create and calculate required fields (e.g., Plot_ID). It is not necessary to calculate Unique_ID or Parent_ID if using the Validate Tool described in the steps below
Use the Copy then Paste Special workflow described above for Stands
Open InventoryManager and navigate to the Stands that contain the plots that were just loaded
Select all Stands with newly created Plots
Run the Validate Tool which will:
Create a Unique_ID value for each plot
Assign the correct Parent_ID and Stand_ID for each plot
...
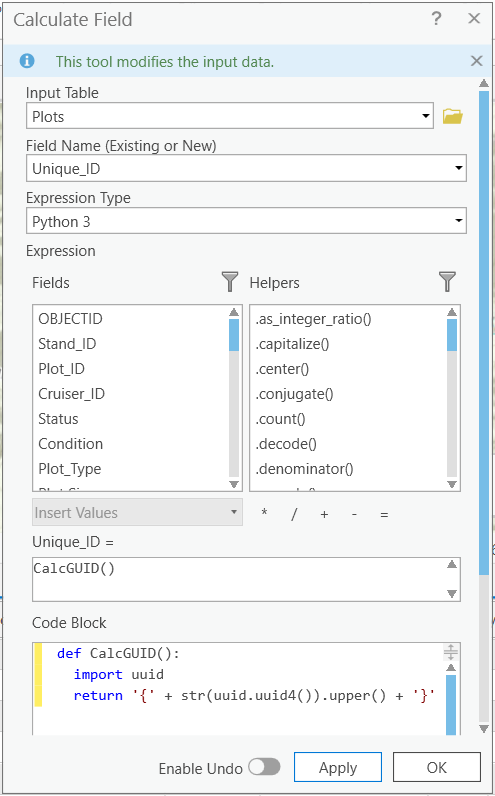
Click OK to run the field calculation for all currently selected rows
Repeat process for all layers (stands, plots, trees, logs)
Interface in ArcMap
Interface in ArcGIS Pro

...
Here is the Esri documentation on editing data from feature services in ArcGIS Pro https://pro.arcgis.com/en/pro-app/help/data/services/use-web-feature-layers.htm