Overview
Tree and Log data can be imported from other systems including TCruise desktop, TCruise Mobile, DataPlus, etc. Regardless of the import, the Stands and Plots spatial features must already exist in ArcGIS. For more information on creating Stands and Plots outside of MobileMap and InventoryManager, see InventoryManager: Data Creation Outside of MobileMap and InventoryManager .
Stands and Plots
As noted in the overview, Stands and Plots must already exist in ArcGIS and must have valid relationships. Stands and Plots must have values for their Unique_ID field, and plots must include their parent Stand’s Unique_ID in their Parent_ID field. Additionally Stands must include a valid and unique value in their Stand_ID field. Similarly, Plots must include a valid value in their Plot_ID field. Stand_IDs must be globally unique while Plot_IDs need only to be unique within their Stand. It may be useful to use the 'Validate Plots' tool InventoryManager: Validate Plots to ensure that Plots have Unique_ID values and correctly reference their parent Stand.
Import CSV Tool
The ‘Import CSV' tool in InventoryManager is similar to the 'Export’ tool (with Excel output) in that it uses a configuration file to crosswalk between incoming data model (columns in the CSV file) and the outgoing data model (ArcGIS feature service used to store Stands, Plots, Trees, Logs). To create an import process, therefore, you must one or more data file(s) and an import configuration file.
Import Configuration File
The import configuration file follows the same format as the export configuration file described at InventoryManager: Export Inventory Data . It may contain fewer attribute fields because:
Some legacy systems supported fewer attributes, especially at the Stands and Plots levels
Some attributes may not be desired when importing data
The table below shows an example of a simple import configuration file for importing Tree-level (no Logs) data produced from a TCruise SQLite Export file using the processed described in the next section:
table | index | esriName | exportName |
Stands | 1 | Stand_ID | Stand_ID |
Stands | 2 | Status | Status |
Plots | 1 | Stand_ID | Stand_ID |
Plots | 2 | Plot_ID | Plot_ID |
Plots | 3 | Status | Status |
Trees | 1 | Stand_ID | Stand_ID |
Trees | 2 | Plot_ID | Plot_ID |
Trees | 3 | Tree_ID | Tree_ID |
Trees | 4 | Species | Species |
Trees | 5 | Tally | Tally |
Trees | 6 | DBH | DBH |
Trees | 7 | Height_to_Record_Top_Diameter | Height_to_Record_Top_Diameter |
Trees | 8 | Product_Number | Product_Number |
Trees | 9 | Reproduction | Reproduction |
Trees | 10 | Saw_Stopper | Saw_Stopper |
Trees | 11 | Pulp_Stopper | Pulp_Stopper |
Data Files - General
Data files for the 'Import CSV' tool are single tables that contain all of the attribute information that will be imported for the Stands, Plots, Trees and Logs. They are non-normalized data, meaning that there will be redundant data at the higher levels (e.g., Stands and Plots). If logs are included in the import, the data file will have 1 row for each log, and thus each tree will be repeated multiple times - once for each log in that tree. If logs are not included, the data file will have 1 row for each tree, and thus each plot will be repeated multiple times, once for each tree in that plot.
Data Files - TCruise Desktop
To create a data files for the 'Import CSV' from data stored in TCruise Desktop, use the Export as SQLite option to export a SQLite file that contains the data. Follow the steps below to generate a data file from that SQLite file:
Open the TCruise SQLite export file in DB Browser
Paste the following SQL command into the Execute SQL tab:
selectPlots.STRATUMID as Stand_ID,"Cruised" as Status,Plots.PLOTID as Plot_ID,"Cruised" as Status,TREENO as Tree_ID,SPC as Species,COUNT as Tally,DBH,HM as Height_to_Record_Top_Diameter,PN as Product_Number,RP as Reproduction,IIF(STTOP < 999, STTOP, "") as Saw_Stopper,IIF(PWTOP < 999, PWTOP, "") as Pulp_Stopperfrom Treesleft join Plots on Trees.PLOTNO = Plots.PLOTNOClick run and verify the correct number of records, the values in all attributes, etc. Modify the SQL command as needed to fix column names, include/exclude columns, etc.
Export table as CSV file by clicking Save the results view > Export to CSV
Open CSV file in Excel to perform final QC prior to import. Verify that Stand_IDs and Plot_IDs match data in map in InventoryManager
InventoryManager
Select ‘Import CSV’ tab
Select import configuration CSV file
Select the data file created using steps above
Click the Stands - Process button to load the Stands attributes (only Status field if using SQL above).
Click the Plots- Process button to load the Plots attributes (only Status field if using SQL above)
Click the Trees - Process button to load the Trees records
If Logs will be loaded, click the Logs- Process button to load the Logs records
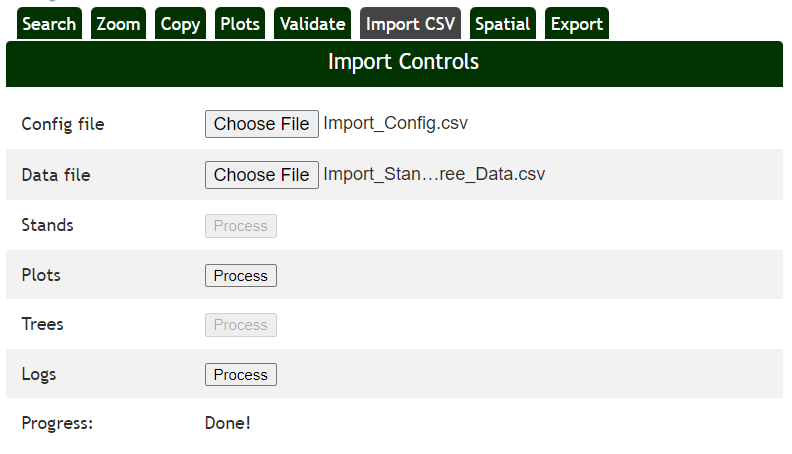
Note that the Process button will be disabled after it is clicked to prevent the accidental re-run of that step. This is especially important with the Trees and Logs levels as it could result in the creation of duplicate data.