The query and collect toolbar includes (from left to right) an 'identif'y' button, a 'draw' button, a 'GPS collect' button, and an 'edit' button.
Identify: The 'identify' button allows the user to query the attributes of existing features (read-only).

Manual Data Collection: The
“draw” button enables the user to manually delineate new features. This
method of data collection can be used if the user wishes to collect
data at a location that is different from their current GPS location, or
when they are unable to travel a path or polygon boundary. To collect
data in draw mode, tap the draw button and select the desired feature
layer. To draw a point, tap the screen at the desired location. To draw a
line or a polygon, drag your finger/stylus on the map to create the
desired outline of the shape (trace mode, default), or tap the map to
create individual vertices and double tap to add the final vertex (tap
mode). See Digitizing Method in MobileMap general settings to change between trace and tap modes.

GPS Data Collection: The
'GPS' data collection button allows the user to collect data at the
location that the GPS is currently reporting. Tap the 'GPS
collect' button and select the desired layer for data collection, then
tap the screen anywhere on the map to begin collecting a feature. For
point features, a single tap will add a new point feature at your
current location. For polyline and polygon features, the first tap
(anywhere on the map) will add the first vertex of a new feature,
and subsequent taps will add additional vertices. Double tapping the map
will add the final vertex to complete the polyline or polygon feature.


Edit Existing Data: The
'edit' button allows a user to select a feature that was previously
collected (or downloaded) and make edits. To begin, select the edit
icon, and then select the desired layer for data editing. Next, tap on
the feature on the map you wish to edit.* The edit attributes window
will open. Attributes may be edited in this window. To edit geometry,
select the pencil icon from within the Edit attributes window and then
draw an edit feature on the map. Prompts will then guide the user
through expanding, truncating, realigning, or replacing the edited
feature. Click the disk button to save the edits and close the window.
If you have trouble selecting an existing point feature for editing, make sure you are zoomed in close to the point on the map. If you are still having trouble, increase the Search Buffer in the settings (Settings > Search >
Search Buffer). If you have trouble selecting a point that is spatially close to another point, zoom the map in close to the point and set the Search Buffer to a small number such as 1 or 10 m.
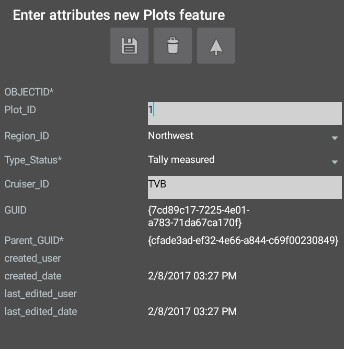
Adding/Editing Attributes
Regardless of the method used to delineate a feature’s geometry, the attribute editor interface is the same. The attribute editor includes all of the attribute fields in the feature layers data model. Some fields (e.g. created user, GUID) are read only. Other fields (e.g., Plot_ID, Notes) are free text fields that are edited using the software keyboard. Other fields use dropdown lists to select a value from a list of allowed values. Still other functionality (such as photos or trees) are launched from buttons. Fields with asterisks (*) indicate required fields that must be populated before the record can be saved or closed.